Ready to proof -- Clare 04/7/22
KJ proofed on 4/13 and sent Clare corrections
CLJ revised on 4/13
Ready for author
Black –
the Fine Details
Photo: NiseriN, iStock/Getty Images Plus, via Getty Images
By Kai Krauß, Andrea Höpke and Markus Mahn, Orion Engineered Carbons
The Colorful Nature of Black
With most people, colorimetry conjures up the image of bright and shining colors. Producers of black colors naturally have a different perspective. Their occupation inherently makes them think of black colors and coatings. Now and again, gray joins their palette. This might literally sound rather monotonous, but it really isn’t in practice. Gray tones particularly demonstrate significant variations when it comes to the so-called undertones. Deep-black coatings also all have their own undertone, which can be highly relevant to the end user. As a general rule, a difference is made between blue and brown (reddish) undertones, revealing the colorful world hiding underneath the deep-black cover.
In addition to this color spectrum, there’s another exciting and challenging obstacle to master: the measurements are done on surfaces with virtually no reflection. This places great demands on the diligence of the work process and the measurement technology used. This topic has been of interest for a very long time and has inspired, among other things, the development of a method for the measurement of the hue-dependent blackness value and undertone (MC and dM).1 These have developed into the standard of deep-black coating measurements of colors and coatings.
Blackness Values MC, MY, dM
The measurement of black coatings takes place within the L*a*b* color space, with a value lower than five on the L* axis. This is equal to a light reflection of lower than 0.1 percent. When venturing into the realm of deep black, such as the standard topcoats used by automotive OEMs, for example, we quickly reach a range of L* < 1.
The colorimetric properties of a black coating system can be described using the hue-independent blackness value MY (jetness). The measuring method is specified in DIN 55979. This is joined by the absolute contribution of hue dM, which is also often called the undertone. The blackness value determines the black content, in other words how deep the black is from a colorimetric/optical perspective. The undertone describes the colorimetric/optical perception of the color shade. The undertone is called blue if dM > 0 and brown if dM < 0. The blue undertone is generally preferred for technical applications, especially in automotive topcoat systems, as it yields a more lush result and an impression of brilliant color. Brown undertones on the other hand tend to be perceived as warm and are thus preferred for interior applications, and above all, wood coatings. Dependence of jetness MY as a function of reflection is depicted in Figure 1.2
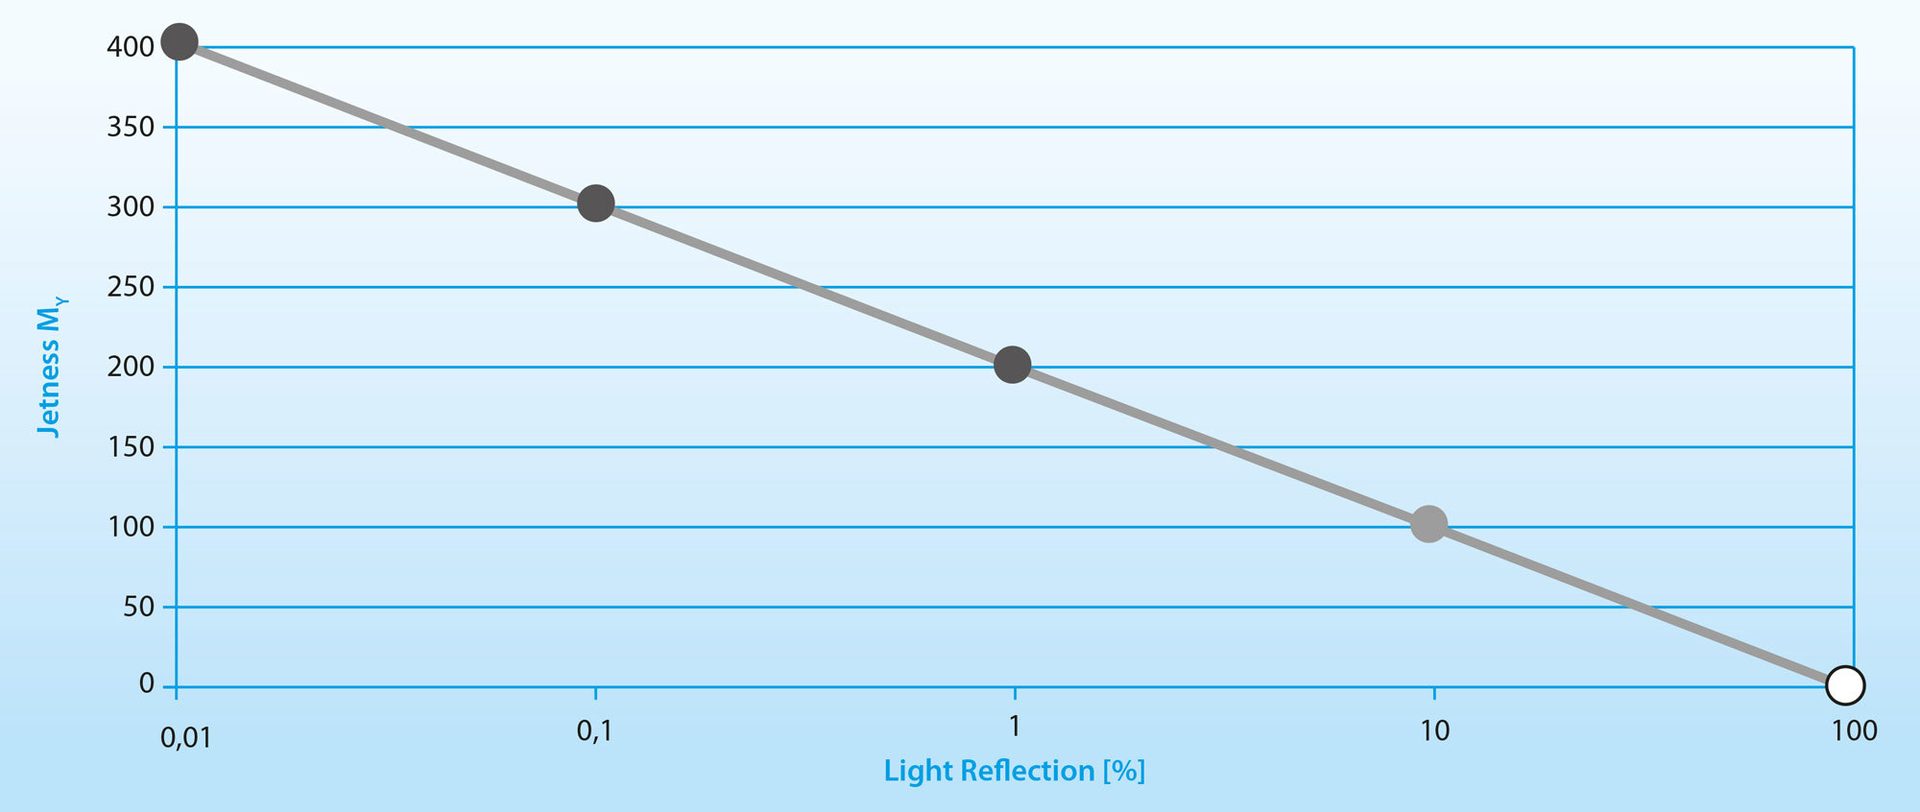
FIGURE 1 ǀ Jetness MY as a function of reflection.2
MY, MC and dM can be calculated using the following formulas:3
CIE L*a*b* Color Space
The CIE L*a*b* color space was developed to achieve a better correlation with human color perception. The lightness L* and the color coordinates a* and b* make up this color space. They are calculated on the basis of the tristimulus values X, Y and Z. The standard color values required, when using light source D65 and an observer at a 10° angle, are defined as Xn = 94.81, Yn = 100,0 and Zn = 107.34.3 Here, Y represents the relevant value for the perception of the lightness, which correlates with the L* value in the CIE L*a*b* color space, whereas X and Z are necessary to calculate the a* and b* values. The relevant formulas are as follows:
The relationship between the lightness L* and the hue-independent jetness MY as a function of the tristimulus value Y is depicted in Figure 2.3 This logarithmic presentation has the advantage of significantly spreading out the region of very low reflection (Y < 1), which more clearly emphasizes the distinction between the black and deep-black ranges. Without using this logarithmic depiction, differences that are readily discernible to the eye cannot be adequately represented in numbers.
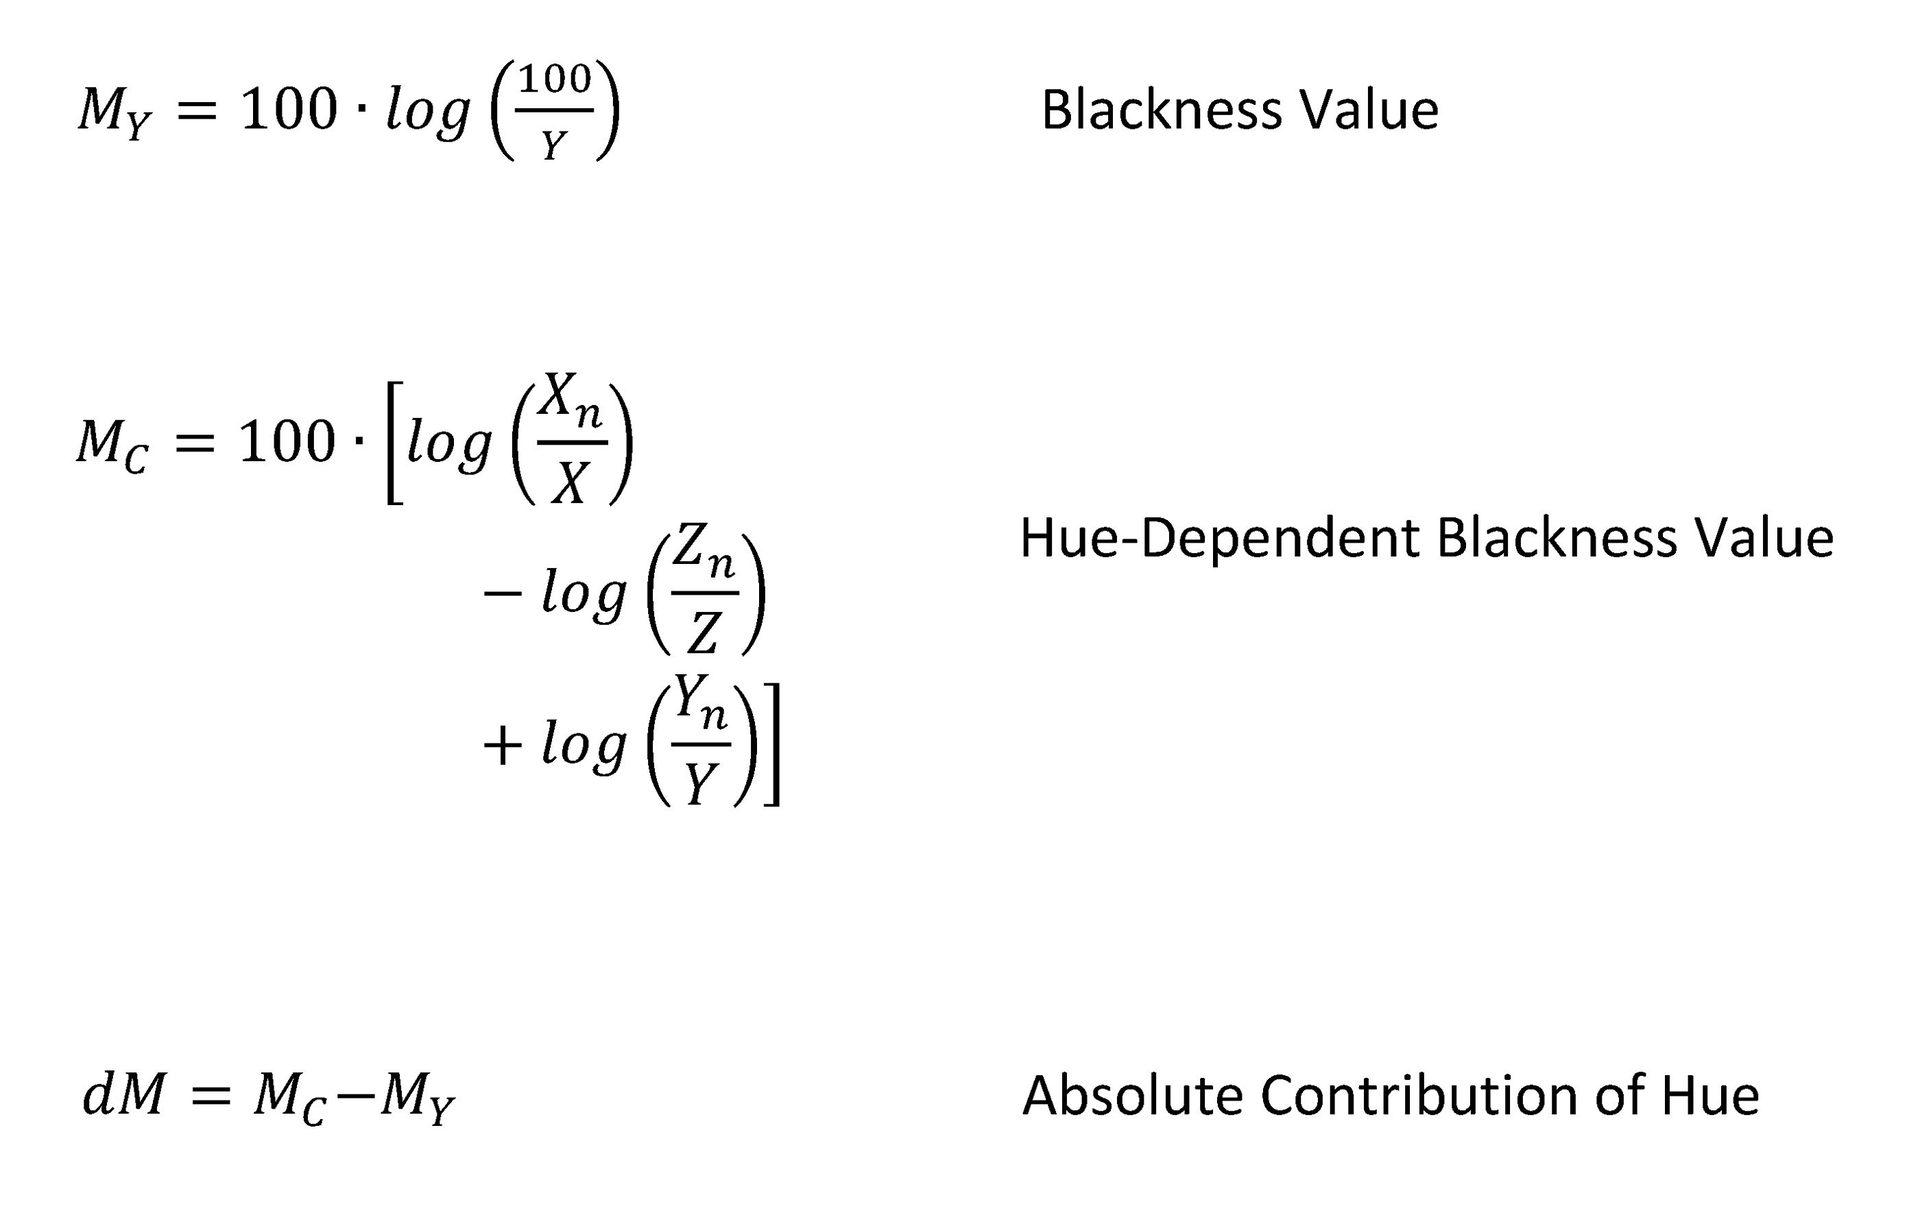
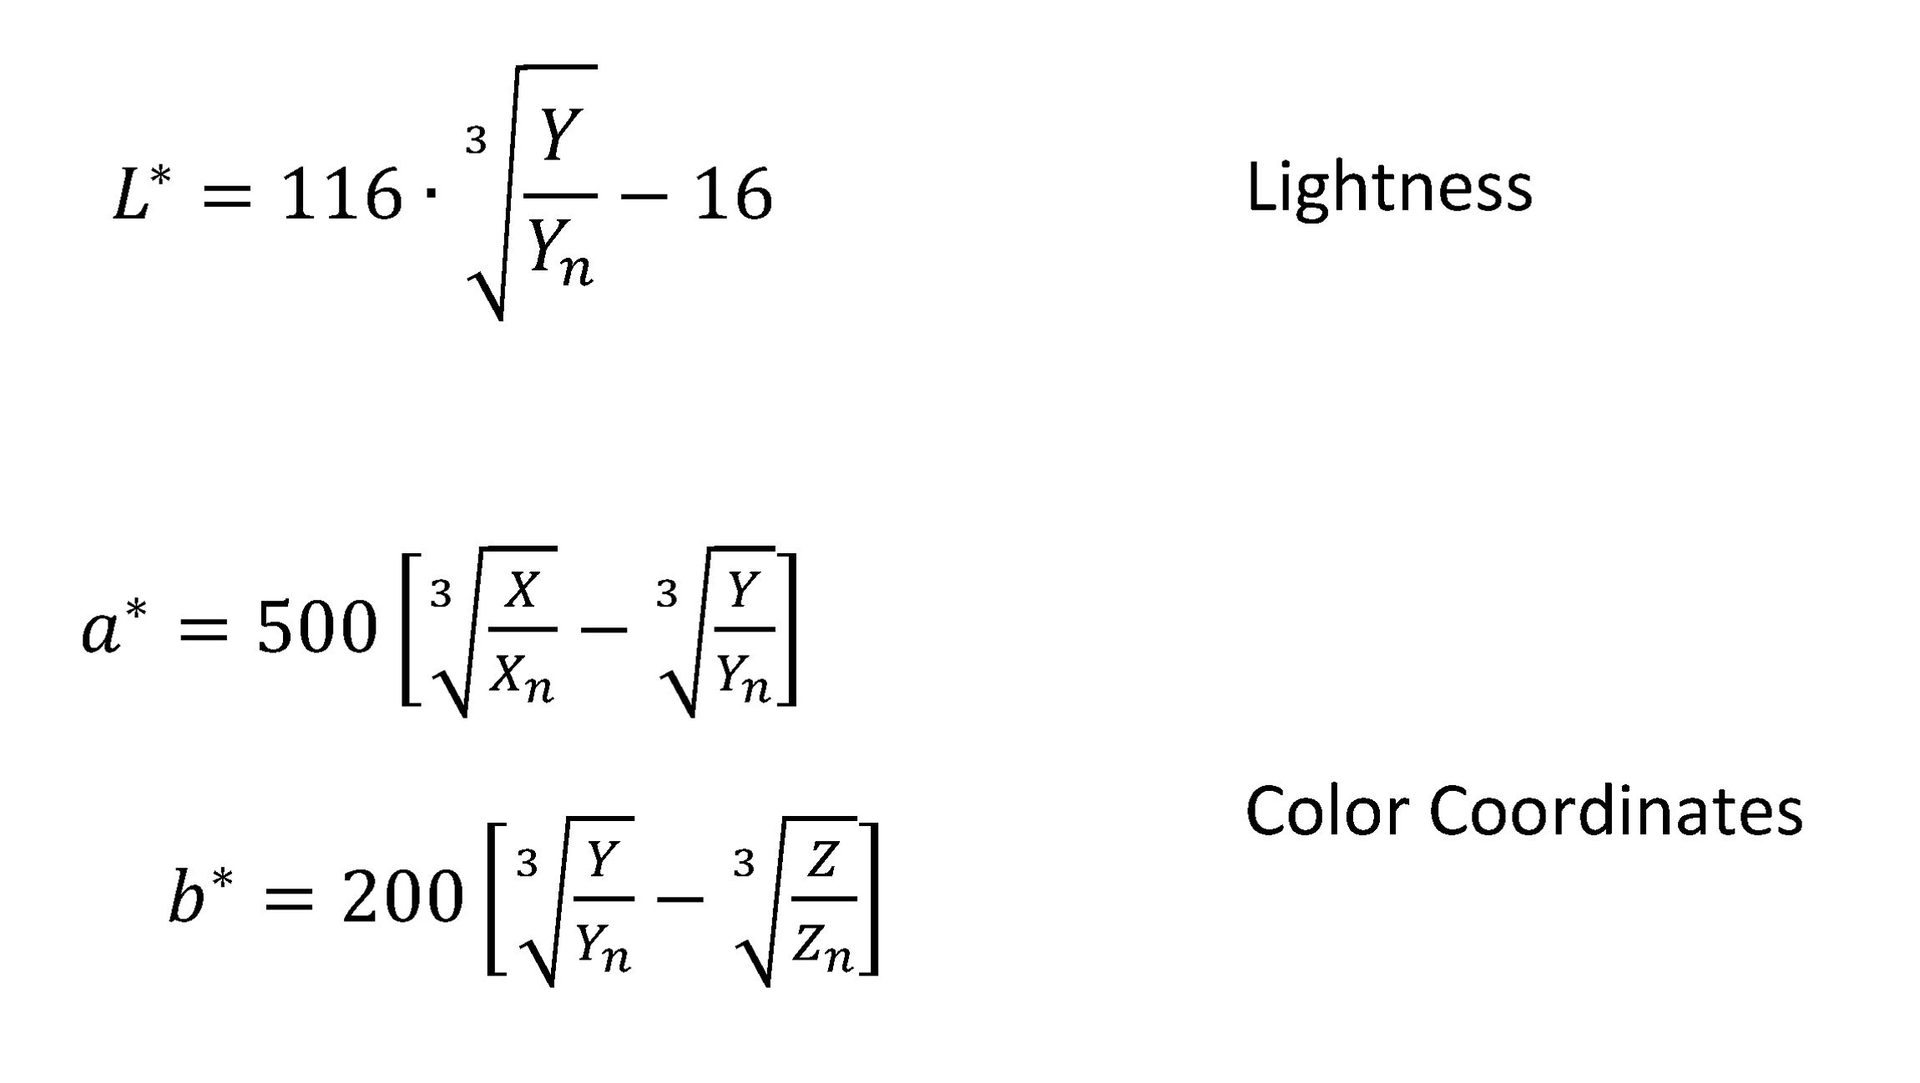
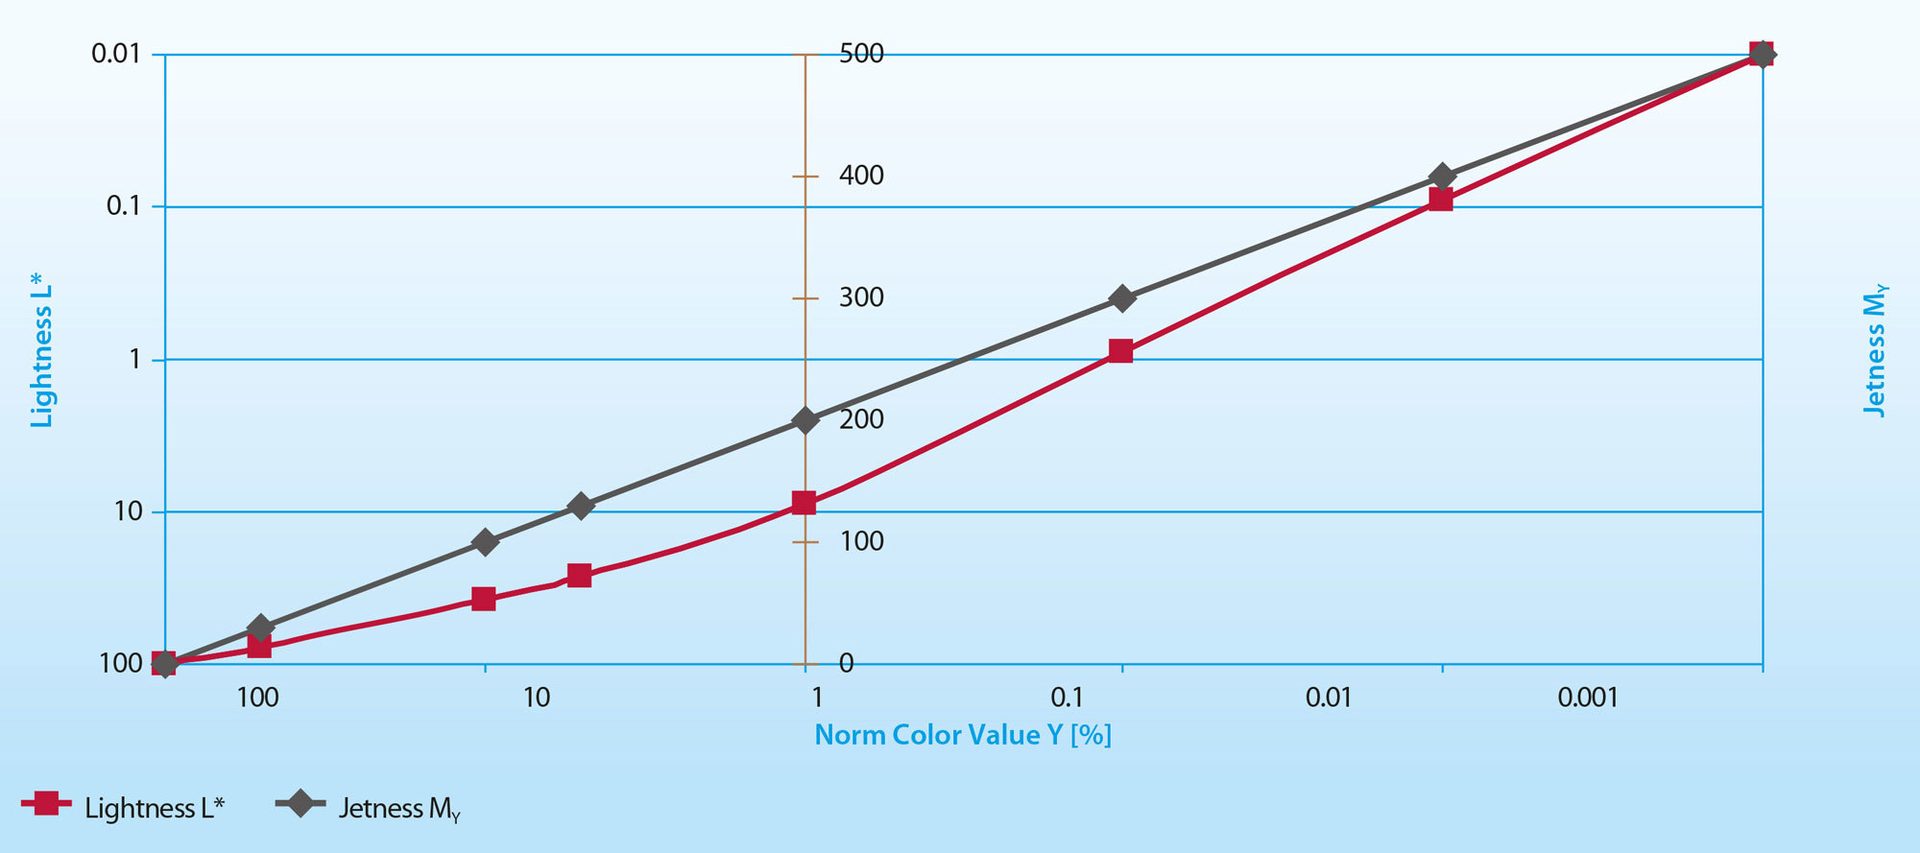
FIGURE 2 ǀ Correlation between lightness L* and blackness value (jetness) MY.
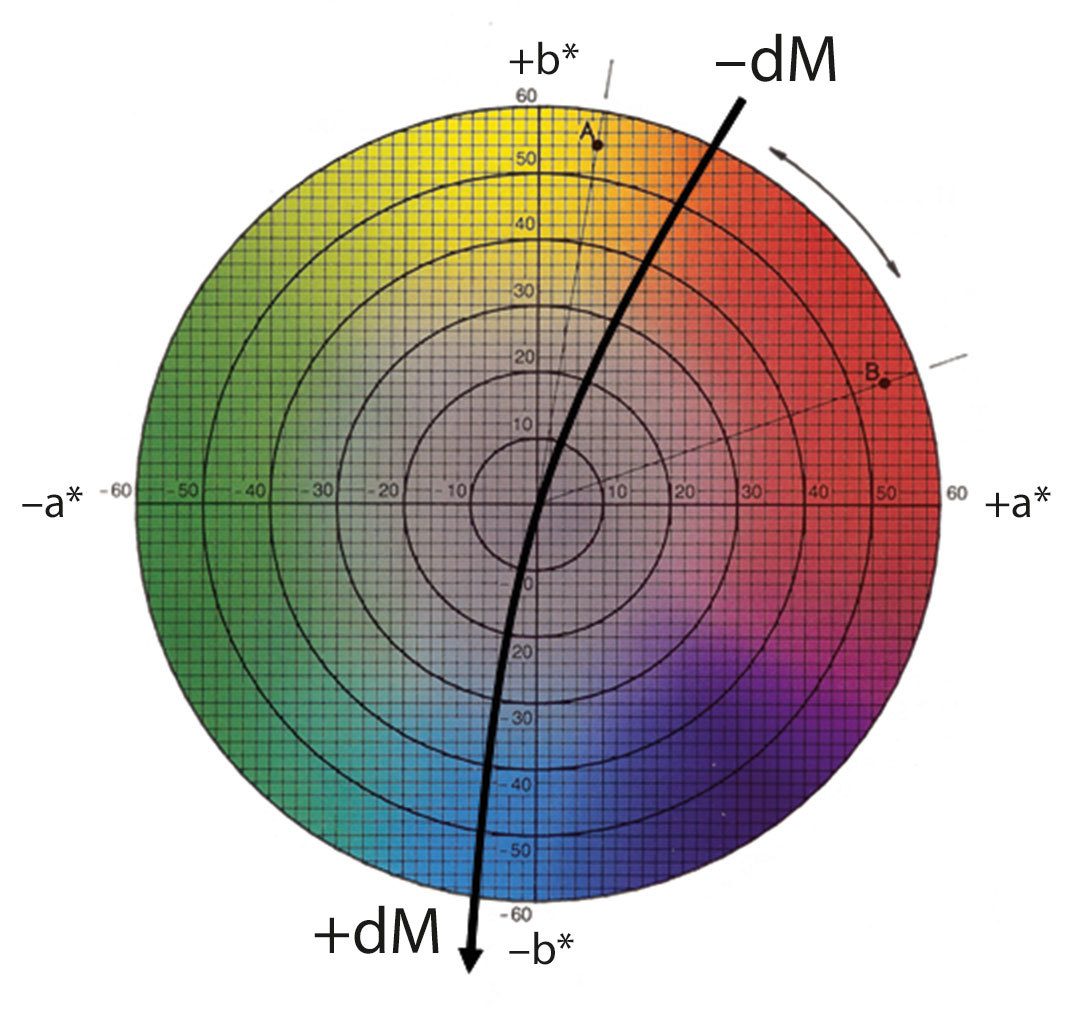
FIGURE 3 ǀ Absolute contribution of hue dM displayed in the CIE a*b* color coordinate system.
The correlation between the absolute contribution of hue dM and the color coordinates a* and b* is depicted in Figure 3. A negative b* value here represents a blue undertone with dM > 0. With a positive b* value in the yellow range, the dM value is negative and corresponds to a brown undertone.
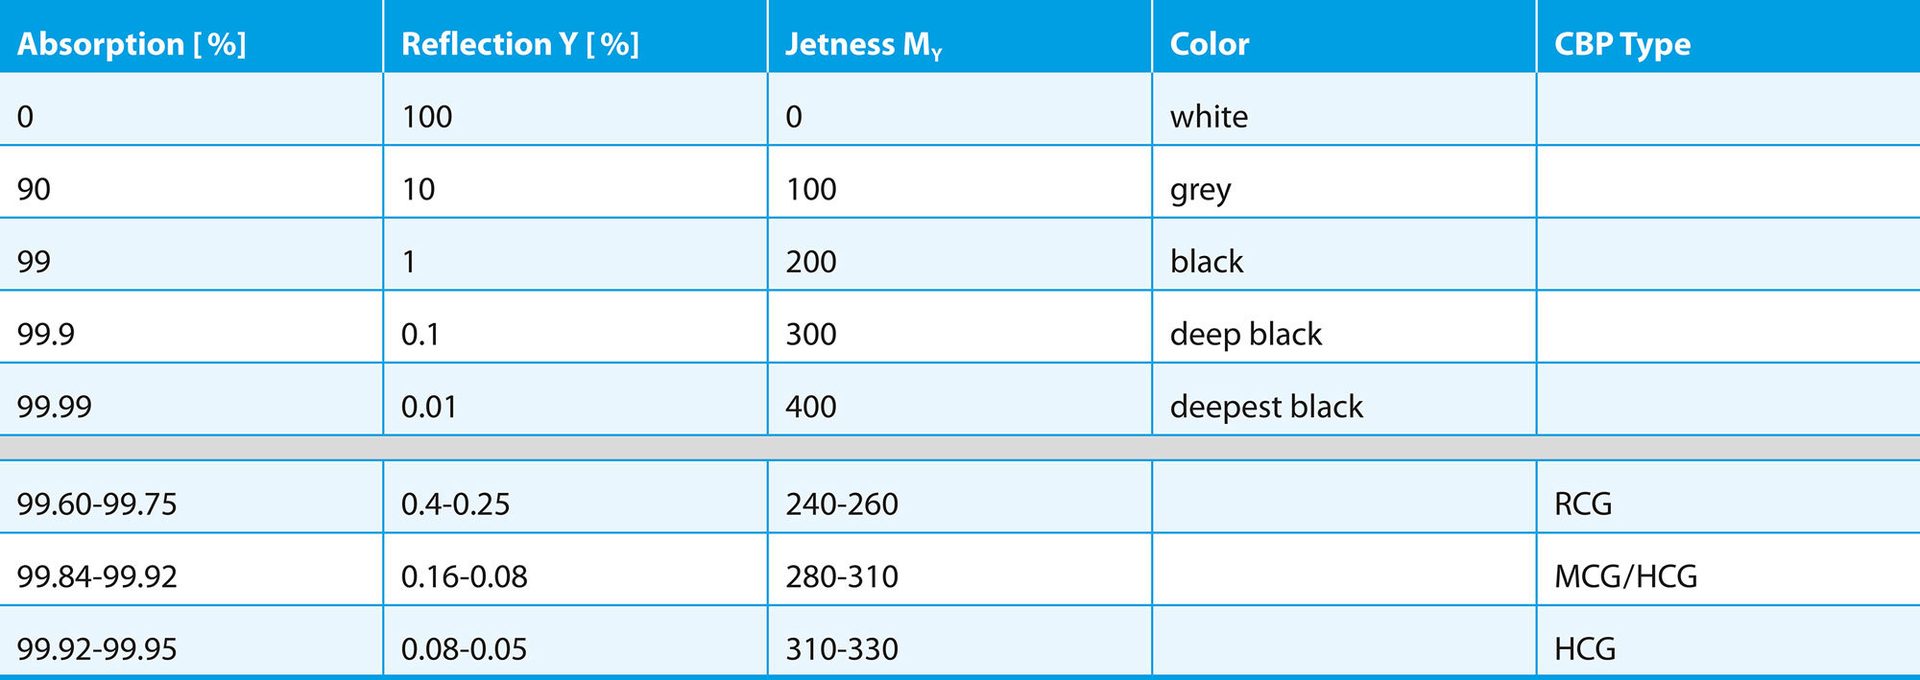
Depending on the absorption and reflection properties of the coating, this can be divided into various color ranges, as depicted in Table 1. Colors are only classified as black at less than one percent reflection; for deep black, this value drops even lower to less than 0.1 percent reflection. Carbon blacks are subdivided into various degrees of black following generally applicable classifications. In Table 1, the coatings that are produced with the designations Regular (RCG), Medium (MCG) and High Color Gas Blacks (HCG) following this nomenclature are also listed.
TABLE 1 ǀ Color depending on the absorption and reflection of light.
Measurement Technology
The measurement described in DIN 55979 was introduced to facilitate a better differentiation in the region of lowest reflection. This makes it possible to also determine the blackness of black coatings with a high color depth. In addition to the suitable calibration, which is described in more detail below, this places great demands on the measurement devices themselves. In general, the measurement geometry can be varied between 45°/0° or 0°/45° and d/8° or d/0°. Which geometry is selected depends on the type of black coating and its surface texture.
The measurement of deepest-black coatings on a glossy surface necessitates a measurement geometry of 45°/0° (Figure 4 left). A large aperture is necessary to ensure that the measurement is as accurate as possible: it is important to detect the greatest amount of “potential” reflection. In addition, the measurement device must guarantee an accuracy in the reflection values of at least four decimal places, and the software used must be able to process this as well. Replicate measurements should be characterized by very small standard deviations to keep the “device noise” to a minimum. The relevant calibration standard should be a black hollow body (light trap).
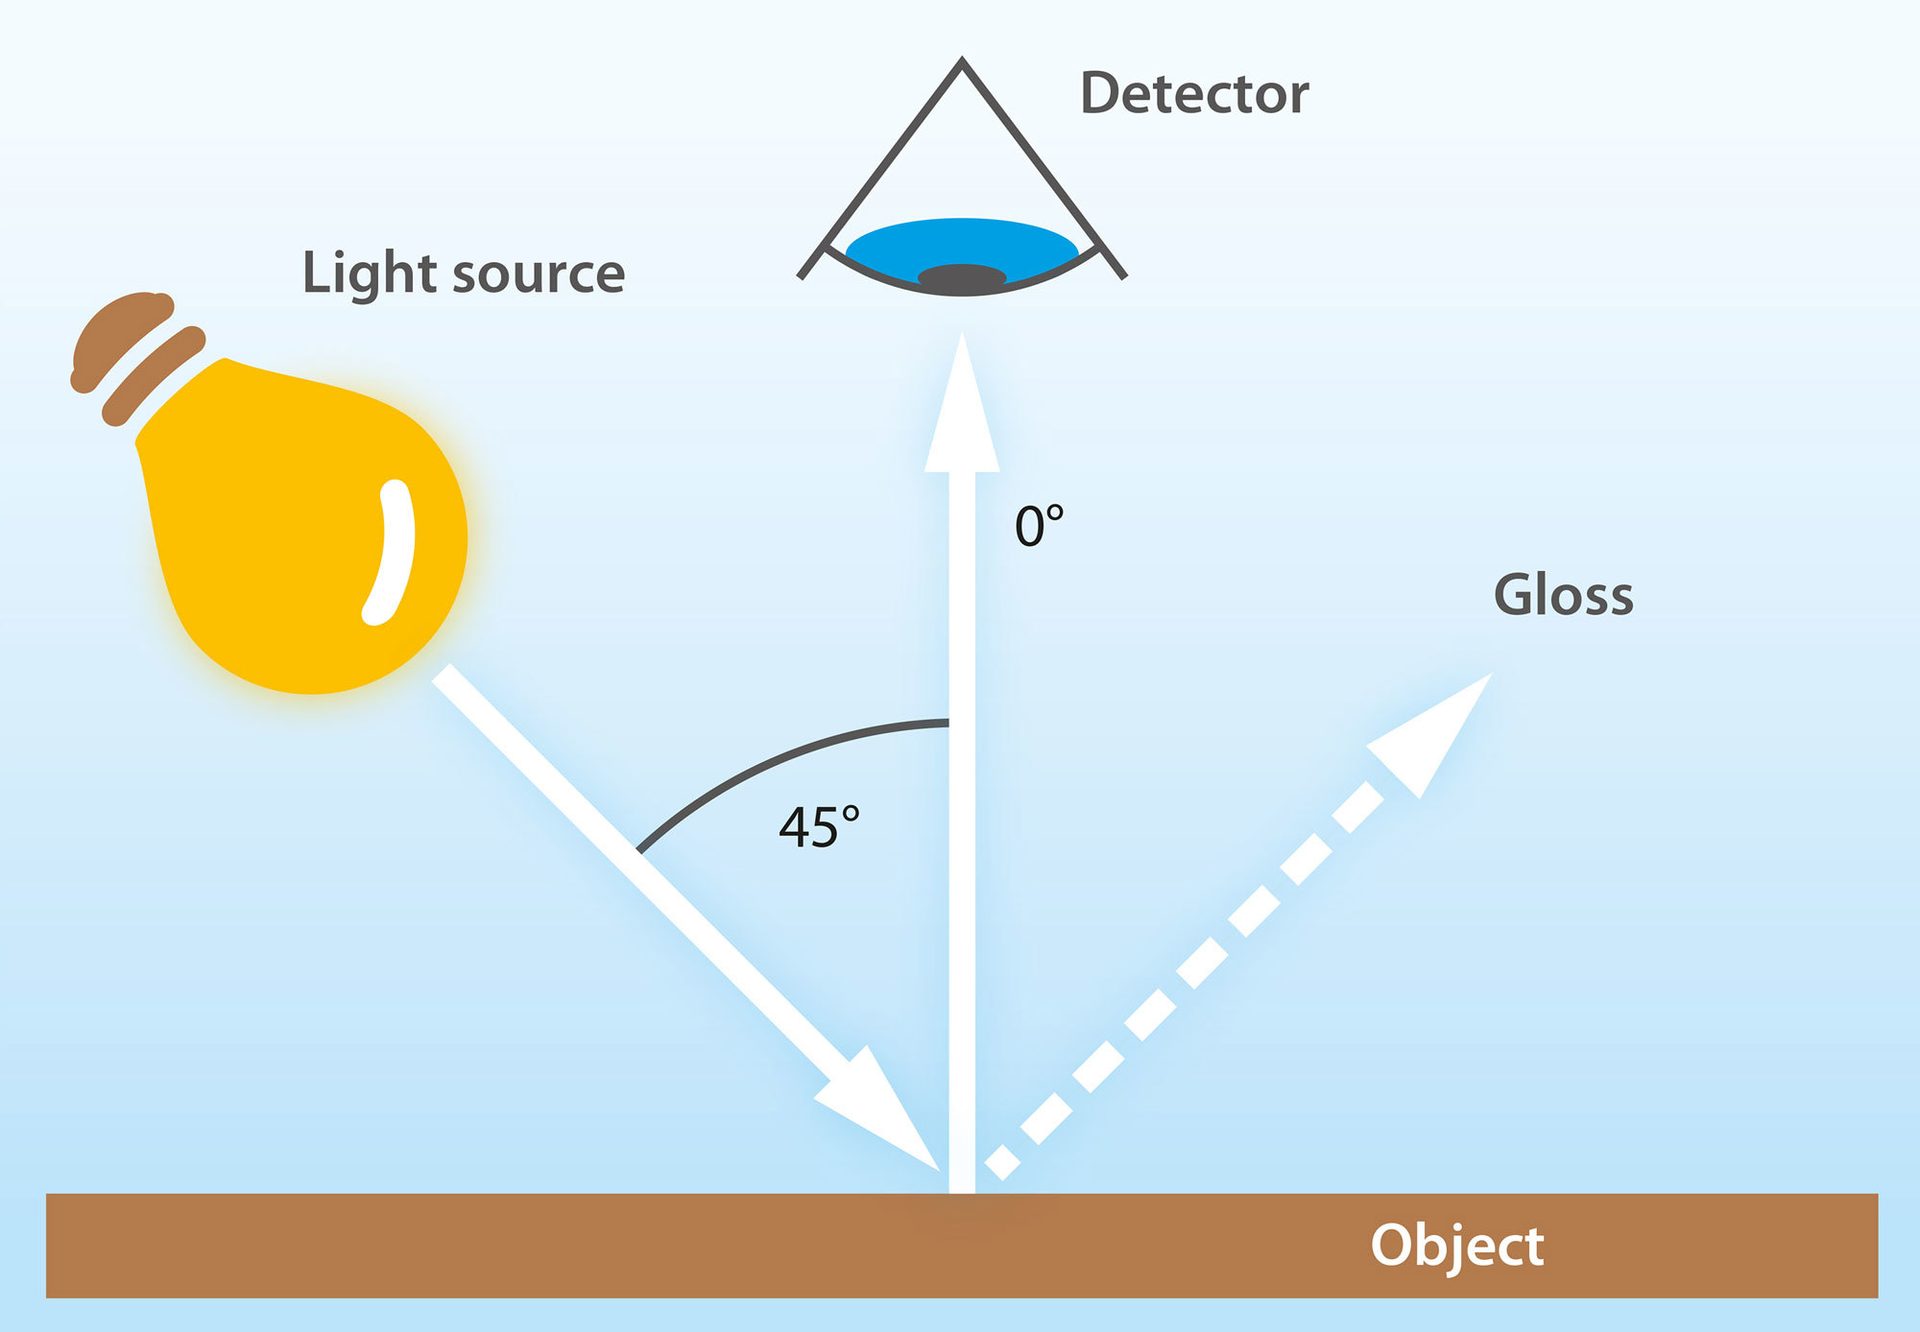
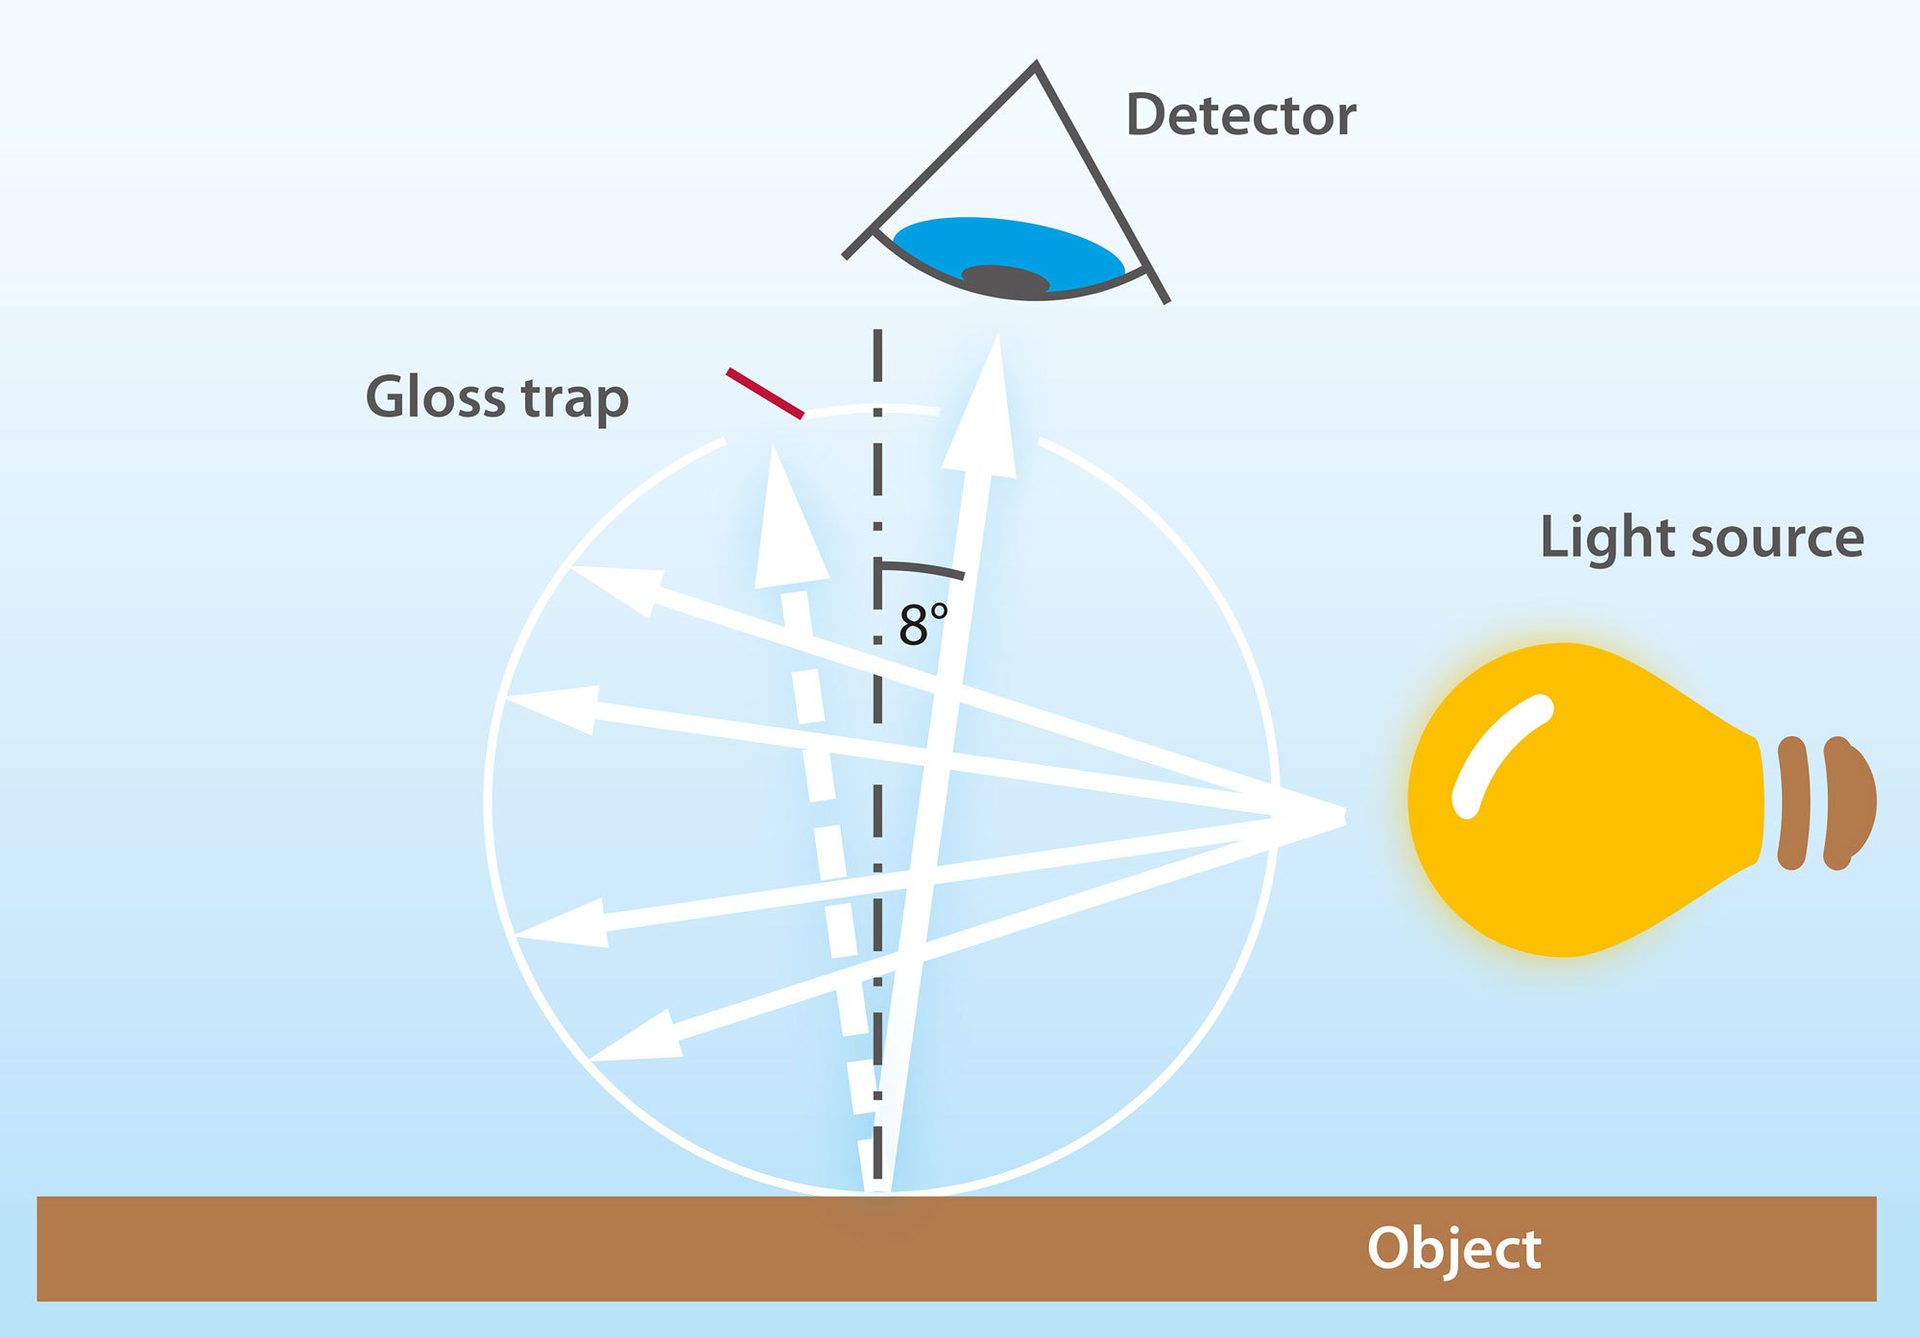
FIGURE 4 ǀ 45°/0° geometry (left) and d/8° (right) geometry for measuring the blackness value and the undertone.
Influence of Surface Reflection
With coatings that are less deeply black and matt, or very structured surfaces, a d/8° geometry can be used, for example. In this case, a spherical measurement geometry — the so-called integrating or Ulbricht sphere — is used to generate diffuse light (Figure 4 right). A gloss trap is included with this measurement geometry. In its closed condition (gloss is included in the measurement), surface-independent objective color values are generated; something the human eye is not capable of. In its opened configuration (gloss excluded), values determined approach the perception of the human eye. These values are also particularly significantly influenced by matt and structured surfaces. In Table 2, it becomes clear that the difference between d/8° and 45°/0° measurement geometries is particularly pronounced for the deepest-black plates 3 and 4.
TABLE 2 ǀ Comparison of measurement values of plates with different blackness levels, measured with two measurement devices (45°/0° and d/8°), and comparison of measurement with and without gloss trap.
Gloss is an optical property that is described as the capacity of a surface to reflect strongly focused light, similar to a mirror (Figure 5). If the gloss trap remains closed, all reflected and scattered light becomes part of the detected light. This leads to a lower blackness value with glossy samples. This is clearly recognizable when comparing the MY values with the d/8° geometry in Table 2.
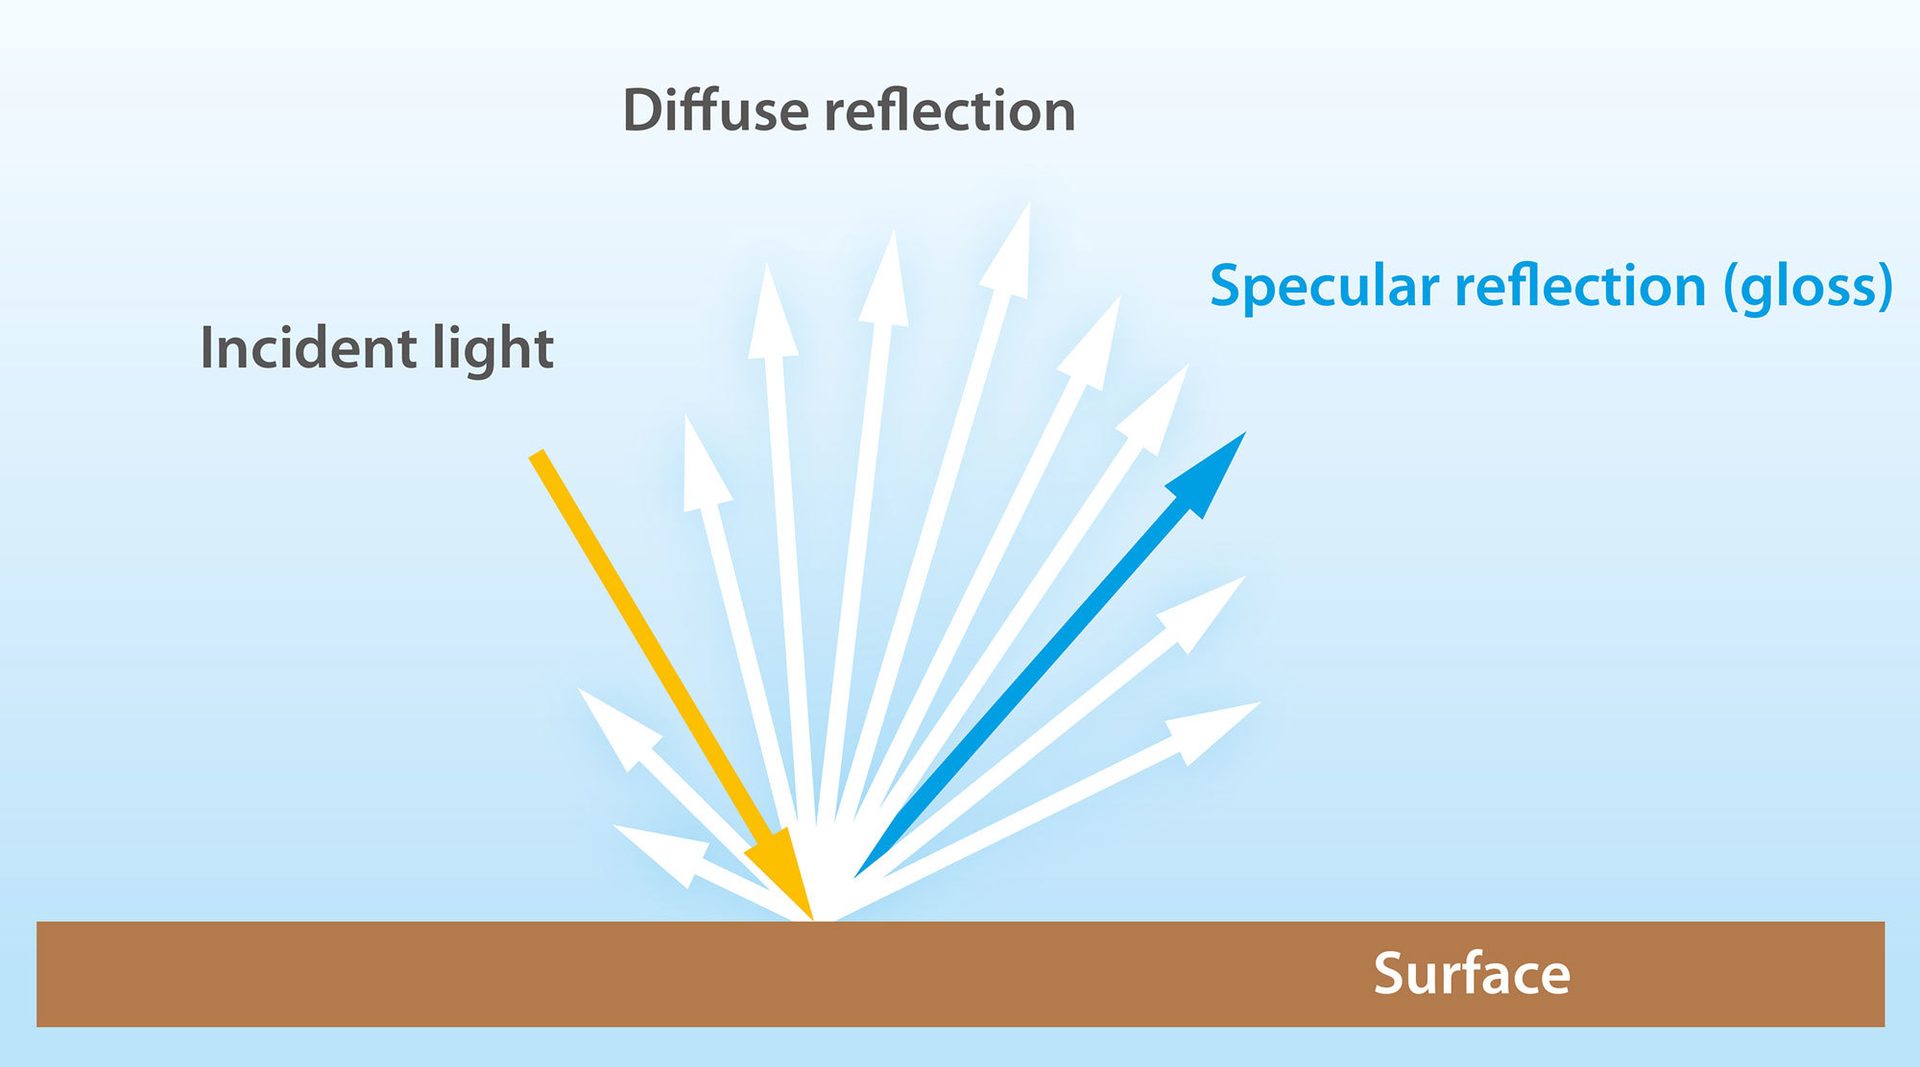
FIGURE 5 ǀ Diffuse and specular reflection of light on plane surfaces.
Practical Measurements
As has already been mentioned in the introduction with regards to blackness values MY, MC and dM, the measurement of black coatings takes place in the L*a*b* color space with a value lower than five on the L*-axis, or even at values lower than one for deep-black coatings. In addition to the great demands this places on the measurement technology, the most minor contaminations or even scratches on the plates to be measured can lead to large deviations between measurement results. Deviations in the reflection of as low as 0.005 can already result in great variations in the measurement result. To give an example: measuring the same plate once with and once without a fingerprint leads to significantly different measuring results. Simply wiping away the fingerprint also fails to produce the same results as an initial measurement on the clean coated surface. This becomes apparent in Figure 6 and Table 3.

FIGURE 6 ǀ Comparison of a coated panel without and with fingerprints and following inadequate cleaning (from left to right).
TABLE 3 ǀ Comparison of colorimetric data of a perfectly clean plate, the same plate with finger print and after several cleaning steps.
The table shows that the differences aren’t as pronounced in areas of lower color depth (Plate 1) as they are in higher color depth regions (Plate 2). Only after very carefully cleaning the surface multiple times with isopropanol/water can the correct results be repeated. To assess the cleaning results, we advise to observe it under a very strongly directional light, as discreet streaks cannot be detected under normal/diffuse light (Figure 7). When measuring various samples, it should additionally be assured that the samples are always positioned in the same manner.
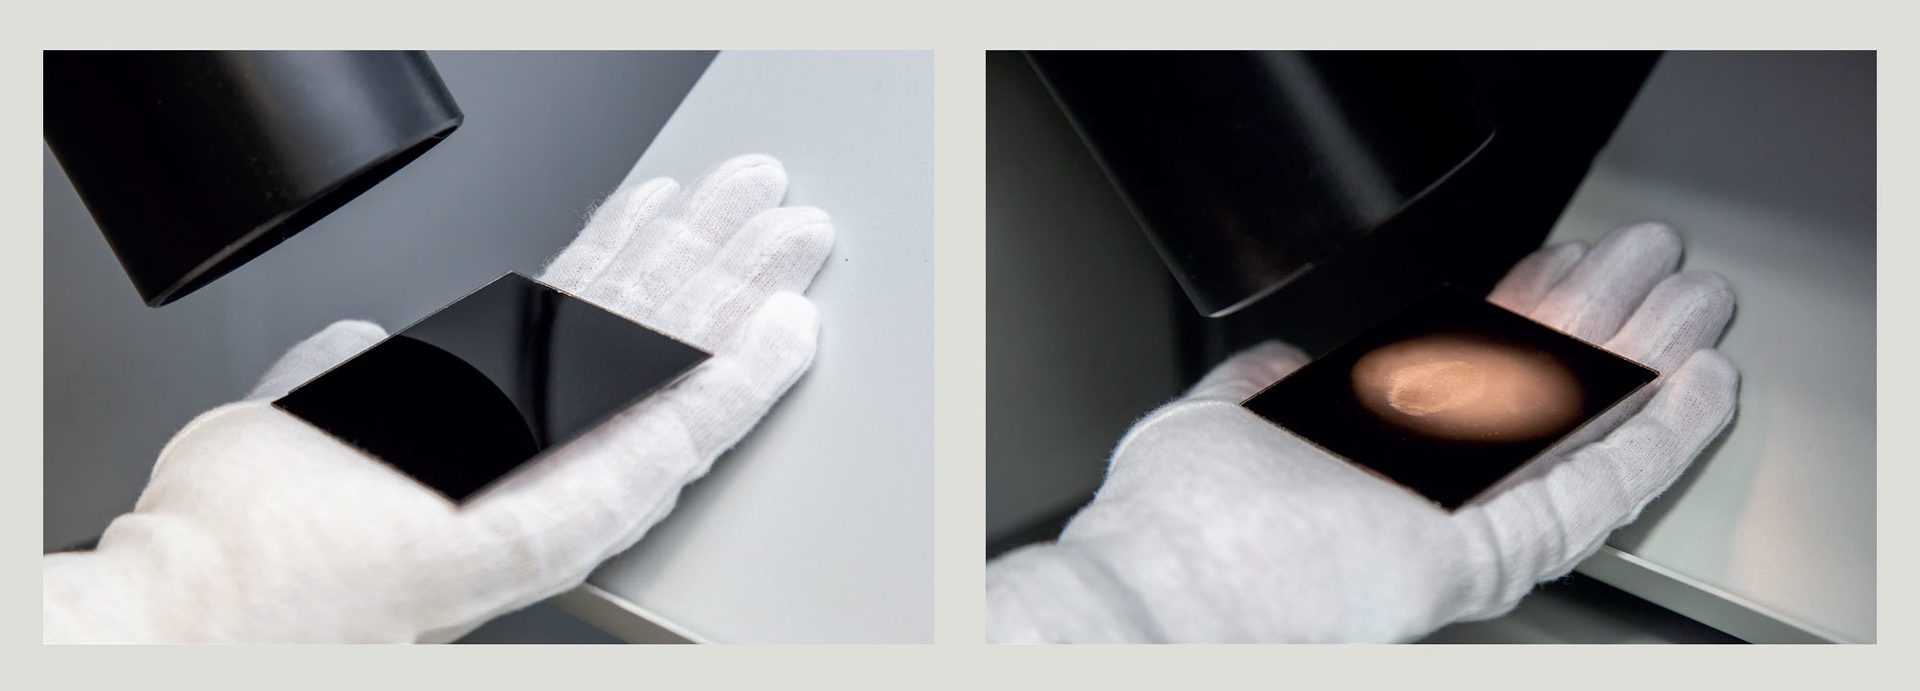
FIGURE 7 ǀ Coated panel with streaks observed under diffuse (left) and strong focused light (right).
The measurement device must ideally be set up in an air-conditioned and clean environment, as the measurements that are performed here take place “close to devise noise,” which means that deviations in the ambient temperature can influence the measurement results. If there are too many dirt or dust particles in the air, their reflection can also lead to lower blackness values. This above all also already applies during the calibration of the device.
Calibration for Measurements in the Deep-Black Range
Naturally, the same discerning demands placed on cleanliness (e.g., preventing fingerprints) must also be placed on the calibration plates and the gloss traps, and generally on the calibration black standard. When calibrating with the black standard, the device is set to its “zero value,” which serves as the reference value for the samples to be measured. As such, it is of crucial importance that this zero value is determined as exactly as possible. There are various black standards available on the market. In addition to the calibration plates, black traps are common. A further variant is an air measurement that is then used to set the “black standard.” The calibration plates for blacks available on the market usually fall short of the black that one wishes to measure in the deep-black high-gloss range. The main reason for this lies in the continuous development of new, even more intensive black pigments that still need to find their way into the production of calibration plates.
We have come to realize that calibration plates, common black traps, and "air" measurements are not suited to our measurement of deep blacks. We therefore use a custom-built black hollow body instead. This metal cylinder has an opening on one side, with a sphere mounted inside on the base. The interior is completely coated in matt black. Now, if the measurement aperture of the measurement device seals off this black hollow body, it can be assumed that virtually no light reaches the detector.
After calibration, a test is performed on black measurement plates that correspond to the color depth range of the sample to be measured. Measurement of the commonly used basic standard does not suffice for the measurement range requirements here; therefore, a set of six plates in the MY = 228 and MY = 360 range is used. Here, it is crucial that the entire measurement range can be detected by the measurement device before proceeding with the actual measurements. The measurement results should always be evaluated relative to the measurement series, since using other independent calibrations in the deep-black range will introduce some discrepancies. It is thus necessary to always and immediately include the selected standard into the measurement and not to simple use it as a data template.
Colorimetric Properties in Full-Tone Coatings
The jetness MY and the undertone dM of coatings pigmented with carbon blacks are influenced by a wide range of physical and chemical parameters. Illustrative hereof are the average primary particle size, pigment concentration, the functionalization of the pigment surface, stabilization with additives, and of course the aforementioned measurement conditions.
Assuming that the optimal measurement conditions laid out in this article are met, the average primary particle size is the main factor influencing the jetness MY and the undertone dM. This applies irrespective of the fact that the dispersion of carbon blacks never produces the primary particles, but only produces the superordinate structure, the aggregates. In order to measure the differences, the carbon black particles must also be well dispersed in the system. To this end, they must be stabilized in an equally appropriate manner within the binder system. In coating systems that contain organic solvents, the use of surface-modified, polar carbon black is advised. In water-based systems, non-surface-treated, non-polar carbon black is usually better suited.
Figure 8 depicts the dependence of jetness MY and the undertone dM on the primary particle size in a water-based PU coat. Finer particles usually result in a higher black value with a blue undertone in covering coats. Coarser particles result in a lower blackness value and a brownish undertone. It is worth mentioning that the effect on the undertones is precisely the opposite with transparent colorings and grey blends. Carbon blacks with finer particles result in brown undertones, and carbon blacks with coarser particles in blue undertones.
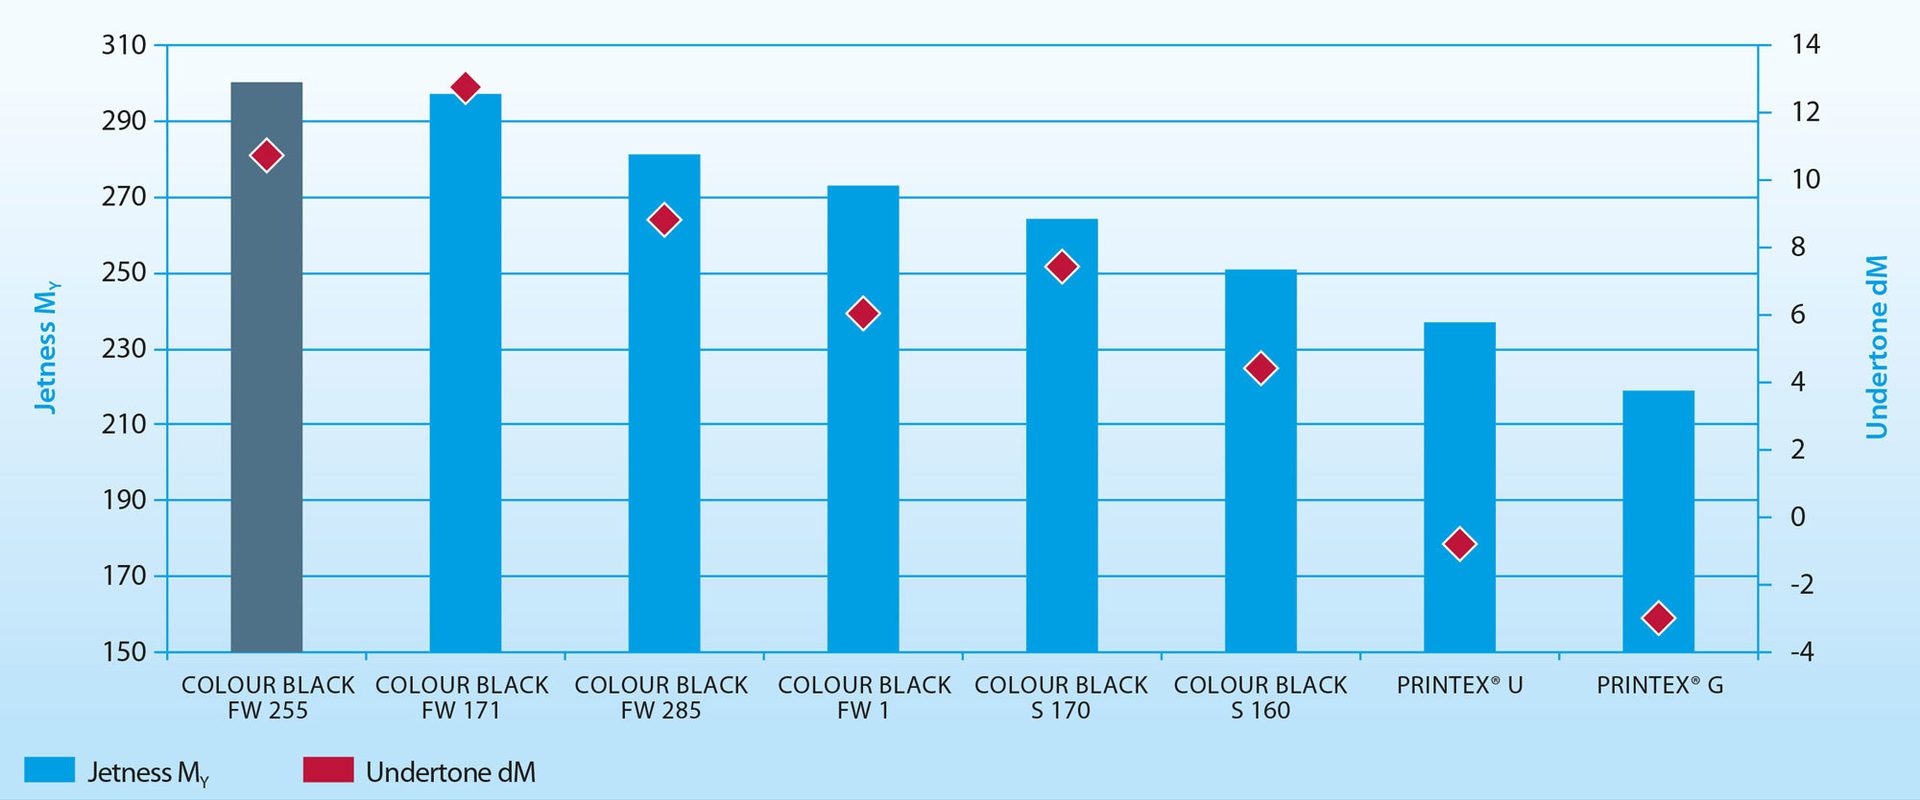
FIGURE 8 ǀ Colorimetric properties of different carbon blacks in waterborne 1K-PU coating. The mean primary particle size increases from left to right.
THE RESULTS AT A GLANCE
- The measurement of deep-black coatings places great demands on sample preparation as well as the measurement technology and calibration. The use of calibration plates usually does not suffice, as they are not black enough. Instead, a so-called black hollow body, which absorbs virtually all the light, is used. As deep black can only be measured on high-gloss and clean plates, any contaminants must be very thoroughly removed and the plates must be absolutely free of scratches, finger prints and similar before measuring.
- If these specifications are followed, replicable measurements of deep-black coatings are possible and information about the blackness/jetness MY and undertone dM can be obtained.
- The undertone itself can either re-inforce the impression of blackness (in most cases with a blue undertone) or decrease it (in most cases with a brown undertone).
References
1 Lippok-Lohmer: Farbe und Lack 92 (11), 1024 (1986).
2 Specialty Carbon Blacks in Modern Coating Systems: Industry Information 0402, Orion Engineered Carbons GmbH (2017).
3 Coloristic Properties of Specialty Carbon Blacks in Full Tone and Tinting Applications for Coatings - Technical Information 1464, Orion Engineered Carbons GmbH (2015).
This article originally appeared in the May 2019 issue of the European Coatings Journal.
